Pages

Showing posts with label guest designer. Show all posts

Tuesday, 1 December 2009

Guest Design Projects for Jillibean Soup

Back in September I was one of the lucky ones to be chosen as guest designer for Jillibean Soup. Here are the projects I created using their delicious products:

Back 2 School:


Dream:


Lil' Witch


Brace Yourself:


I only... I knew:


This layout has hidden journaling regarding Renee's move to another school and now on top of that we are moving back to Australia:


And finally a card:


To find out what supplies I've used head on over here to find out.

I really enjoyed working with the Jillibean products and you might have guessed that the Soup Staples are my favourite. I hope you enjoyed my projects too.

Friday, 25 September 2009

Jillibean Soup Guest Designer + Scrapbook Inspirations 58

This morning I received an email from Ingrid congratulating me on being chosen as one of the guest designers for Jillibean Soup. I was excited to read her email as I had not yet discovered that I had been chosen. Congratulations to all the other girls as well of course! Here's the full list:


The deadline to send in your creations was last Friday. It wasn't until the day before that I sat down and created a layout and two cards. I created two cards using Jillibean's Grandma's Christmas Soup.


Supplies - Cardstock: Bazzill Basics, Patterned Paper: Jillibean Soup 'Grandma's Christmas Soup', Clear Stamp: Hero Arts + Autumn Leaves + Basic Grey, Ink: Staz'On (Timber Brown) + Stampin'Up (Real Red) + Rangers Distress (Linen) + VersaColor (Umber), ribbon: John Lewis + haberdashery, Embossing folder: Cuttlebug, Labels Dies: Spellbinder Nestabilities Labels Four + Labels One, Pointsetta: Making Memories, Border Punches: Fiskars, Corner Rounder: Woodware, EK Success, button, twine, pin.

Then I created a layout using Jillibean's Lentil Soup. The tag underneath the picture slides out and has the following journaling on it: Today you are celebrating your eleventh birthday. Not quite a teenager yet, but hormones are most definitely raging. You're having mood swings, you transpire more & little lumps are starting to appear in your breasts. Brace yourself for more and bigger changes. Live life to the full!!


Supplies - Patterned Paper: Jillibean Soup 'Lentil Soup', Chipboard Alphas: Basic Grey, Paint: Making Memories, buttons, ribbon, machine sewing, Border Punch: Fiskars, Label Die: Spellbinder Nestabilities Labels One.

Not all the projects needed to be new or created using Jillibean Soup products, so I chose to send in a layout I did for Scrapbook Inspirations 58, which was out last Friday. The assignment was to make a layout using lace.


Supplies - Cardstock: Bazzill Basics, Patterned Paper: Basic Grey + Collage Press + Creative Imaginations, Alphabet + Number stickers: American Crafts, Clear Stamp: Collage Press, Lace: John Lewis, Label sticker: Fontwerks, Adobe Photoshop to make the text strips.

I thought this was pretty good news just before the weekend starts. Enjoy!

Friday, 31 July 2009

Make-n-Take Sheetload Shortcuts

Today is my final post as Guest Artist for Sheetload Shortcuts. This time Alicia asked me to do a make-n-take. I decided to let you see how I interpret working along a sketch. I used the CardPatterns sketch #23, which was from a couple of weeks ago, but Shortcuts was its sponsor, and I did make the card before we left on holiday.

I hope you enjoy the process.

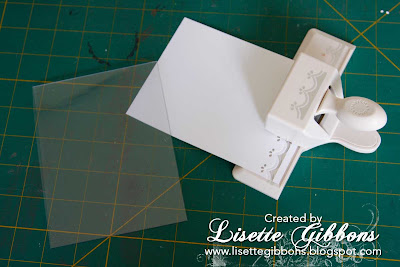
Step 1: I started with of course a clear card from Shortcuts and a piece of cardstock. I punched the border at the bottom.


Step 2: I adhered the cardstock to the back of the clear card using glue dots.


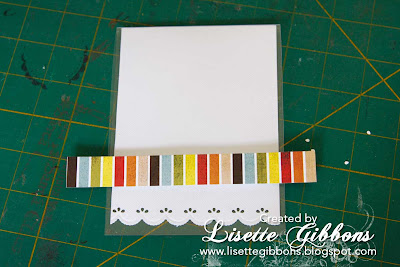
Step 3: I adhered a small strip of paper (3/4") to the lower part of the front. And trimmed it on both sides.


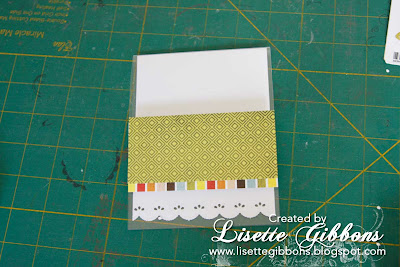
Step 4: I adhered a second strip of paper (2") above the other strip slightly overlapping.


Step 5: I trimmed the edges again. I always like to overlap on both sides before trimming, so I know that it's straight and cut along the edge of the card.


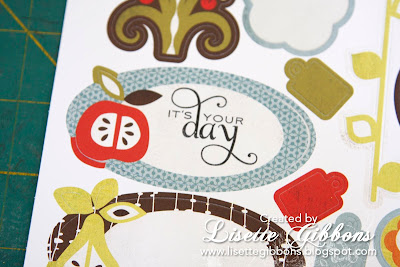
Step 6: Before I adhere the label I first stamp the sentiment on it, to make sure it stamps right on a flat surface.


Step 7: To give the label some depth I use my favourite dimensionals from Stamin'Up.


Step 8: I adhered the label.


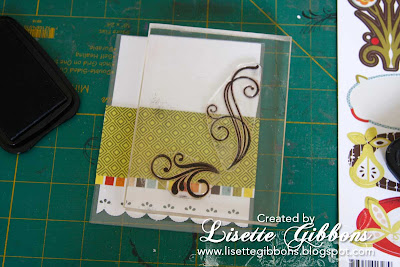
Step 9: Realisinig the card looks quite bare I decide to remove the label gently and add two swirl stamps. I stamped them at the same time.


Step 10: I put the label back in place.


Step 11: As on the sketch I add two flowers and some rhinestones.


And this is the result.


Supplies: Sheetload Shortcuts clear card| Bazzill Basics Cardstock | Martha Stewart border punch | Basic Grey patterned paper + die-cut | Prima flowers | Me and My Big Ideas rhinestones | Papertrey Ink clear stamps | Staz'On ink Jet Black

Sometimes it's very easy to play along with sketches, but they don't always speak to me. This one was a breeze. I hope this has given you some inspiration.

Thank you Alicia for letting me be your Guest Artist during the past month. Have a great weekend.

Friday, 24 July 2009

Shortcuts Guest Artist - Week 3

Another Friday, yeah! Today is week 3 of my Guest Artist spot over at Sheetload Shortcuts. Alicia asked me for this post to create an altered object. I think these are the hardest ones to think of, especially because everything has already been done once. Which is the case of this cutie as well, but I couldn't resist.

I purchased the template for this little bag here. I printed the templates on my inkjet printer on the frosted sheets. After cutting out the pieces the lines would easily wipe off for a clean look.


Supplies: Sheetload Shortcuts sheer sheet | Papertrey Ink Ready, Set, Wrap Template + clear stamps | Staz'On ink Jet Black | Powderz Glitter Lemon | the Essential Glue Pad | Making Memories patterned paper + die-cuts + ribbon.

Thank you for visiting.

Friday, 17 July 2009

Shortcuts Guest Artist - Week 2

Today is my second week as Guest Artist over at Sheetload Shortcuts. This week I've created two cards. What I like about the clear cards so much is that they have depth. I love to keep that sense of clearness.

For the first card I've used a 8.5"x11" sheet and cut down to a 5" card square. On the outside I've just left the clear border. And on the inside the paper just falls under the paper on the front, which shows through when the card is closed (as you can see on the detailed shot).


Supplies: Sheetload Shortcuts | Pink Paislee patterned paper + die-cuts | Papertrey Ink clear stamp | Making Memories ribbon | Martha Stewart Border punch | Staz'On ink Jet Black | Rangers Distress ink Linen | My Mind's Eye buttons | Tag.

For the second card I created along the 365 Card challenge blog, which Sheetload Shortcuts is sponsoring. The challenge is to create a window on your card using see through material.


Supplies: Sheetload Shortcuts clear card | Collage Press patterned paper + die-cut | Paperchase ribbon | My Mind's Eye rhinestones | American Crafts rub-ons | Martha Stewart border punch | Bazzill Basics Cardstock.

This afternoon we are off on our holiday. The next 12 nights we'll be spending here. Click here if you would like to find out more about our destination.


I can't wait.

Saturday, 11 July 2009

Sheetload Shortcuts Week 1

It's Friday and my first project as Guest Artist of Sheetload Shortcuts. For my first creation I was asked to make something using the July '09 sketch from Sheetload of Cards. At the same time Shortcuts has teamed up with Caardvarks using the same sketch. If you would like to play along head on over to their site and submit your creation by July 17th. For this sketch I chose to make a gift card holder:


Supplies: Sheetload Shortcuts GCHF| Making Memories patterned paper + chipboard die-cuts | ribbon | Fiskars star punch + decorative edge scissors | American Crafts foam alphabet Thickers |

Have a great weekend and thanks for stopping by.

Tuesday, 7 July 2009

Sheetload Shortcuts July Guest Artist + Past Weekend Parties

Some of you might have already seen this post, but this month I'll be guest designer over at Sheetload Shortcuts. My creations will be posted on their blog starting this Friday for the next 4 weeks. I hope you'll enjoy them.

This past weekend both Ruben and Renee had a party to attend to. I made this card for Ruben's friend:


Supplies: Bazzill Basics Cardstock | Cosmo Cricket patterned paper + chipboard die-cuts + ribbon | Papertrey Ink clear stamps | Fiskars Uppercrest border punch | Kikki.K white marker | Sizzix star die | Staz'On ink Timber Brown.

I also made a gift card holder for him, but you'll have to wait until Friday to see it (hint! ;)).

Renee had her party yesterday for two of her classmates. This is what I made for them:


Supplies: Bazzill Bascis Cardstock | My Mind's Eye patterned paper | Paperchase ribbon | Fiskars Apron Lace border punch | Staz'On ink Timber Brown | Papertrey Ink clear stamps | Jilly Bean sprouts | KaiserCraft flowers + pearls | buttons | Spellbinder Nestabilities scallop die | Basic Grey clear stamp | Martha Stewart butterfly punch | ZIG marker brown | EK Success border punch Scalloped Scallops | Prima Marketing flowers.

I really struggled to find the right inspiration for the cards, but I was quite pleased with the outcome of the gift card holders.

I'll be back tomorrow with another card.